To build a shoreline beach on your lakefront property, you’ll need landscaping fabric, metal fence posts, mason sand, a wheelbarrow, and shovels. Start by measuring and marking the area, lay the fabric as a weed barrier, stake it down, then spread about 1 foot of sand evenly across the surface. The key to a beach that lasts is getting the foundation right before any sand goes down. Here’s the full process based on how we’ve built them professionally since 1978.
Installing your very own shoreline beach is the pinnacle of waterfront living projects and the perfect companion to accompany your secure and stable muck-free lake bottom. After all, what’s a swimming area without a beach to relax on afterwards?
The Benefits Of Building Your Own Beach
Having your own private beach comes with many benefits. Not only will your beach be free of crowds, but you will be able to access it from the comfort of your own property and host fun, outdoor events where guests can enjoy sand, sports, swimming, picnics, sunbathing and general relaxation. In other words, a perfect Michigan summer!
Another benefit to building your own shoreline beach is that you can start as soon as your ready, save some money, and take pride in a project that has been designed and built with your own two hands!
There are however, a few things you may want to take into account before forging ahead and starting the project. While the DIY process itself may seem straightforward, there are several things you should consider before the build to ensure that you have a safe, long lasting, and fun place for your friends and family to enjoy for years to come!
If after reading this guide you would still like help with your project, we offer beach installation services for lakefront homes in Michigan that can be completed in as little as one day utilizing our patented Sand-Pro System™!
Things To Consider
Maintenance
First and foremost, a properly maintained beach is key for a fun, usable, and safe waterfront space. This doesn’t just mean picking up trash and debris, but also larger tasks that involve weeding and edge control. More on that later.
Size
A second consideration, and one that will largely determine the cost of your project, is size. You want your beach to be large enough for several people to enjoy waterfront activities and socialization without it feeling too crowded or cramped. There really is no ‘right’ size – it just depends on your personal preference and budget. However, if your lakefront property is on a large hill, the transportation of sand to the beach area will be difficult. In cases like these, you may want to consider a smaller beach area.
Aesthetics
Aesthetics is yet another consideration which often doesn’t get enough attention. We’re not just talking about maintenance and edge control here. What we mean by aesthetics is ensuring that your beach imitates nature with a natural slope of the beach that is gradual into the entrance of the water without it being too dramatic and steep. Typically, we suggest a 10-1 rule, meaning for every 10 feet from the shoreline, the beach should slope one foot.
Sand
Finally, and perhaps the most obvious consideration for your shoreline beach, is the sand! You will have to calculate how much square footage of sand you will require for your project (and if your math skills are lacking, you can try this free sand calculator here). In addition to square footage, however, depth must also be considered. We all know that kids (and grownups alike!) enjoy digging in the sand, so you will want to ensure there is plenty of it in order to do so. Generally, we recommend about 1 foot of sand as a good starter depth. Of course, you can always go deeper if you choose, but 1 foot is a great minimum starting point. The cost of the sand is something else to take into account, and will also depend on the size of your beach. For example, Mason sand, which is typically used on shoreline beaches, is approximately $15 per yard. This will cover about 30 square feet of beach area at a 1 foot depth. Keep in mind, that is over 3000 lbs of sand which you will have to physically move and evenly spread using a wheelbarrow and shovel – not a job to be taken lightly! If you would like more information on the various types of beach sand available, you can check out our guide to choosing the right sand for your beach.
Tools & Materials You Will Need Before Starting

Quality Landscaping Fabric
Selecting a good quality landscape fabric is extremely important for the longevity of your shoreline beach. It is essentially the ‘foundation’ of your beach, and will help stabilize the sand as well as help mitigate weeds and erosion. To calculate the amount of landscape fabric needed in square feet, multiply the length by the width of the area you plan to convert into a beach.

Posts to Secure the Landscaping Fabric
We recommend the use of metal fence posts to secure the landscape fabric and hold it in place.

Sand
We previously touched on this, but our recommendation for a shoreline beach is Mason sand.

Good Quality Shovels
You will likely need two different types of shovels for this job: a flat bottom shovel for physically moving and transferring the sand from the wheelbarrow to the beach, and also a pointed shovel for excavating and preparing the area at the start of your project. Some hand shovels are beneficial, too, for finishing touches and smaller areas.

Rakes And Brooms
While this is more for aesthetics, it’s a good idea to have a proper sand rake and/or broom. These can be used for maintenance, and also to ensure the sand is evenly dispersed for an aesthetically pleasing and functional shoreline beach.

A Wheelbarrow
For hauling thousands of pounds of sand, a metal wheelbarrow that is tough and sturdy is going to be your go-to. Sand is heavy, and you will be making multiple trips, therefore a plastic gardening wheelbarrow won’t hold up over time. Take the time to invest in a quality metal wheelbarrow that’s intended for rough and tough work!
The Process:
Step 1: Measure And Mark The Area To Be Converted Into A Beach
The first part of creating a shoreline beach is to measure out and mark the area you will be covering. Having pretty exact dimensions is important, as it will determine the amount of sand needed as well as other materials such as landscape fabric. We suggest adding another 5-10% onto your measurements to account for any miscalculations.
Step 2: Prepare The Site
Preparing the site you measured and marked off involves clearing the area of any debris, trees, bushes, weeds, and other vegetation. If the area is grassy, then all grass and topsoil must also be removed. In order to do this, you will need tools like shovels, rakes, hoes, cutters, and possibly a chainsaw, depending on what’s in your area. After everything is cleared, the site needs to be excavated. You will need to dig out the entire area to the desired size and depth according to your measurements and calculations.
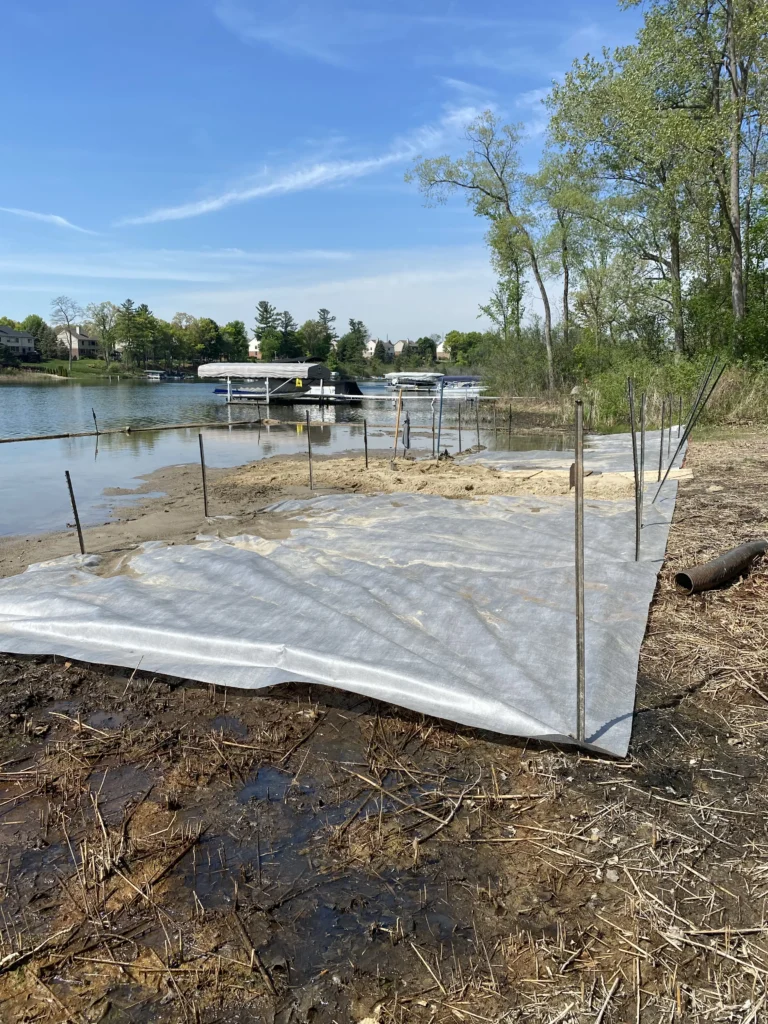
Step 3: Lay Out and Anchor the Landscape Fabric
As previously stated, you will need to calculate the area in square feet in order to determine how much landscape fabric will be needed for your shoreline beach project. To do this, simply take your length measurement in feet and multiple it by your width measurement in feet. Now that the square footage is determined, you can purchase a good quality landscaping fabric which will act as the foundation of your beach and help to mitigate weeds and other growth through the sand. The landscape fabric will need to be cut to the desired size, and then placed in an overlapping pattern before it is anchored into the ground with metal posts.
Step 4: Bring in the Sand via Wheelbarrow
Using your sturdy metal wheelbarrow, you will bring in the Mason sand, one load at a time and begin spreading it evenly across your landscape fabric until the desired depth is achieved.
Step 5: Spread the Sand Evenly
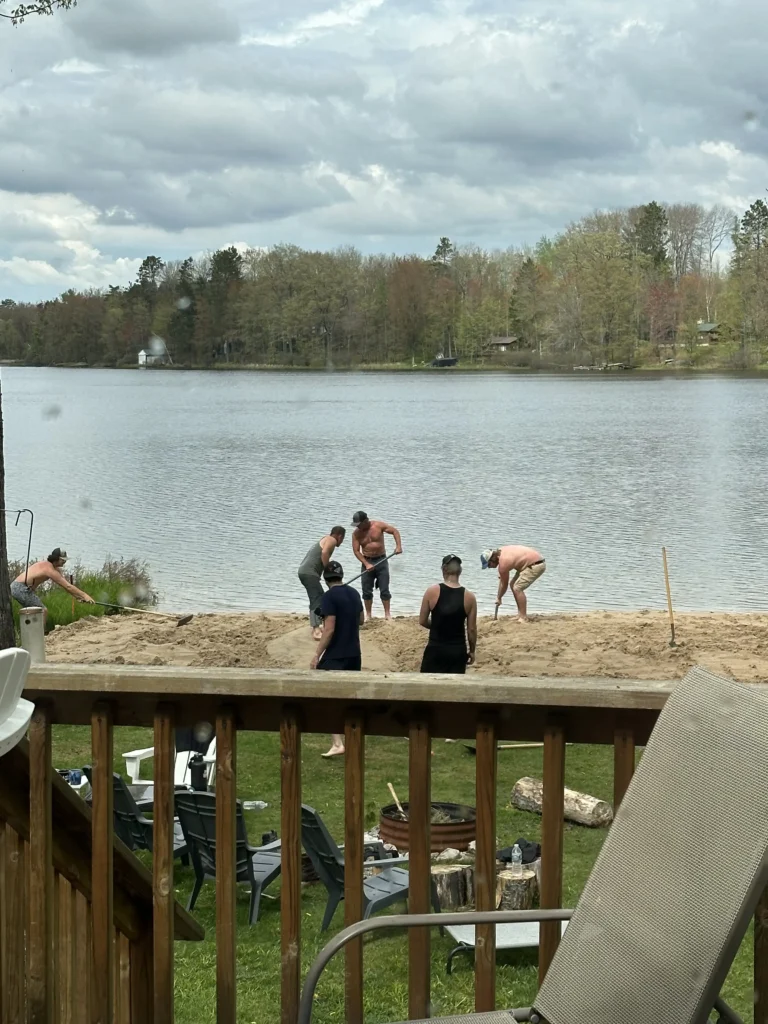
Once all of your sand is placed on the landscaping fabric, you will need to use sand rakes and/or brooms to spread the sand evenly. This not only creates an aesthetically pleasing beach look, but also has a practical function for creating a natural slope from the shoreline. Also remember when spreading your sand that a minimum of 1’ is recommended for maximum sand enjoyment and beach activities, such as kids digging, beach volleyball, and sunbathing. The slope of the sand should also follow the aforementioned 10-1 rule, whereby every 10 feet from the shoreline, the beach should slope ————–
Step 6: Cleanup
After the sand is spread evenly, it is time to clean up the beach area! Picking up any discarded materials, cutoffs, and tools will help you to see the fruits of your labor! After everything is picked up, the remaining beach area should be functional, safe, and beautiful!
Step 7: Maintenance
Once the beach is complete, you will have to regularly maintain it to keep it in good shape. Routine cleaning, debris removal, and addressing any erosion issues will be an ongoing task in order to keep your beach both safe and beautiful. Wind, water, and excess digging may also require you to bring in m
Other Considerations
Now that you have the steps required to build your very own shoreline beach, some additional considerations such as natural edging and erosion might be on your mind. For the edge of your beach, it all comes down to personal preference. Some prefer a natural look, where the beach is just bordered by the grass or a landscape edging, while others prefer a more robust appearance with rocks or wood, such as 6 x 6 timbers.
Possibly the biggest issues with shoreline beaches, however, are weeding and erosion. We all know weeds are insidious, and a constant upkeep, and your beach is not exempt from this. A properly maintained shoreline beach coupled with good landscaping fabric as your foundation will all help mitigate this. Erosion, which is naturally occurring, can only be prevented so much. Installing things like retaining walls or barriers can be helpful, depending on the slope of your landscape and the water levels. However, these things can always be added later on if you feel they are necessary.
Frequently Asked Questions About Building a Shoreline Beach
It depends on the size of your beach. Mason sand runs roughly $15 to $25 per cubic yard depending on your supplier and location. You’ll also need landscaping fabric and metal fence posts. The article above walks through how to calculate exactly how much sand you need based on your measurements. The biggest cost is honestly your time and labor since you’ll be moving thousands of pounds of sand by wheelbarrow.
There’s no set rule. It depends on how many people will use it and what you want to do on it. A small beach for a couple of chairs and water access could be as little as 100 to 200 square feet. If you want room for volleyball, gatherings, and kids running around, plan for 500 square feet or more. You can always start small and expand later.
For the shoreline portion of your beach above the water’s edge, you generally do not need a permit in Michigan as long as the sand doesn’t shift the existing ordinary high watermark. If you plan to place sand or fabric below the waterline, you’ll likely need approval from Michigan EGLE. Always check with your local office before starting work in or near the water.
We recommend mason sand for most shoreline beach projects. It has a fine texture that feels good on bare feet, compacts well to create a level surface, drains quickly so you don’t get mud puddles, and it’s locally available across Michigan which keeps the cost down. Check out our full guide to choosing the right sand for more detail.
We recommend a minimum of 1 foot of sand depth. This gives you enough for kids to dig in, enough cushion for sunbathing and beach activities, and enough buffer so the fabric underneath doesn’t show through over time. You can go deeper if you want, but 1 foot is a solid starting point.
Quality landscaping fabric is the key. It acts as a barrier between the ground and your sand, blocking weeds from pushing through. Make sure you use a good breathable fabric and overlap your seams by at least 3 to 4 inches. Some weed growth around the edges is normal and just requires occasional pulling, but the fabric will prevent anything from coming up through the middle of your beach.
A natural slope following the 10-1 rule (for every 10 feet from the shoreline, the beach slopes one foot) helps water drain without washing sand away. Landscape edging, rocks, or timbers along the borders can also help contain the sand. On larger lakes with more wave action, a retaining wall or riprap barrier may be worth considering. Some sand loss over time is normal and just requires occasional replenishment.
Conclusion
We hope you learned some tips on how to install a shoreline beach! If you have any questions about any of the steps or would like a quote for the installation of a shoreline beach on your lakefront property, we’d be more than happy to help you out!
Written by Curt Trierweiler · Curt Trierweiler is co-owner of TT&C Beaches, a Michigan lakefront beach company started by his father Joe in 1978. Curt and his brothers Craig and Chris grew up in the business and have been building, restoring, and sanding beaches on Michigan's inland lakes for over 40 years. When he's not on a job site, Curt is usually out on the water or helping homeowners figure out the best approach for their shoreline.